The stores are organized by groups and it’s possible to view and work with the stores associated with the brand set with your user.
Stores can have six different states:
1.1. Existing
Existing stores indicate existing stores that are currently open and in business.
1.2. Next
The Next stores indicate the upcoming stores.
1.3. Closing
The Closing stores indicate the stores that are in the process of imminent closure.
1.4. On hold
It is the list of stores currently on standby, the opening is connected to delays or various problems.
1.5. Unlisted
The “Unlisted” stores are those that have not yet been assigned a category and that may have been created from a visual merchandiser during the creation of a report.
1.6. Closed
Gli stores “Closed” sono quelli chiusi e non più in attività.
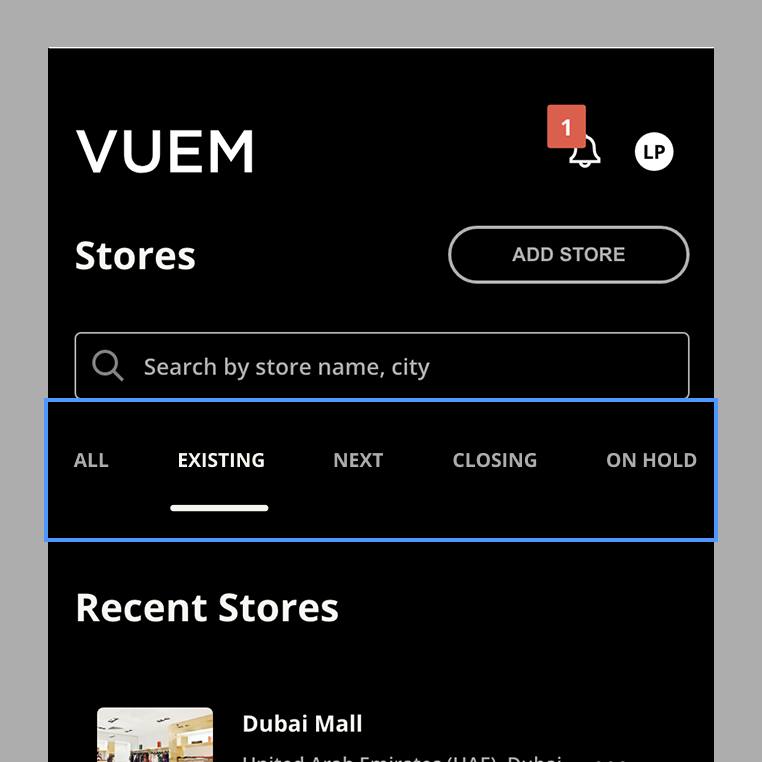
2. Search a store
It is possible to search for a shop through the search bar by the name of the shop or the city where it is located.
3. Filter stores by status
Through the different tabs under the search engine it is possible to filter the shops by the store status.
4. Create a store

It is possible to create a store by entering all the information on the Stores page and pressing the “Add Store” button placed on the top right side of the interface and filling in the requested data.
In Main Information it is possible to enter the name of the shop, the lines and genders present in the store and select the name of a pre-existing partner name loaded into the system. NB: Only administrators can create and manage the list of partners.
The store branch will be entered in Branch by typing “GA” to bring up the list. This is the branch that can manage the store. Once the brand has been inserted, you can then move on to other details.
In store location you can enter the store location information. The country field will be self-filled during the typing and it will show the list of countries in English from the database. The City field will be auto filled using data from the city database. If the city is not present in the system it will be possible to add it with the “ADD +” button.
In the Store Details it is possible to set the status of the store, the Store Type, the Door Code, the concept and add a file for the floor plan.
In the People section you can indicate the contact persons for that store. In Contact Info you can indicate all contact information relating to the store.
It is also possible to create a store by entering the minimum information when compiling a report by entering a name different from those in the system in the Store field. With this method the store will be created with the “Unlisted” state and all the information can be filled in later by the managers or coordinators of the stores. In this way it is possible for a visual merchandiser to compile a report for a store that does not exist in the database and create it.
5. View store details
Going to the Stores section and clicking on a store from the list you can see an overview of the store information, a profile image that can be set to identify the store visually, the list of published reports linked to this store, any files and floor plans relating to the store and for management levels a list of store statistics. In the Details field it is possible to consult all the technical information of the shop.
6. Stores actions menu
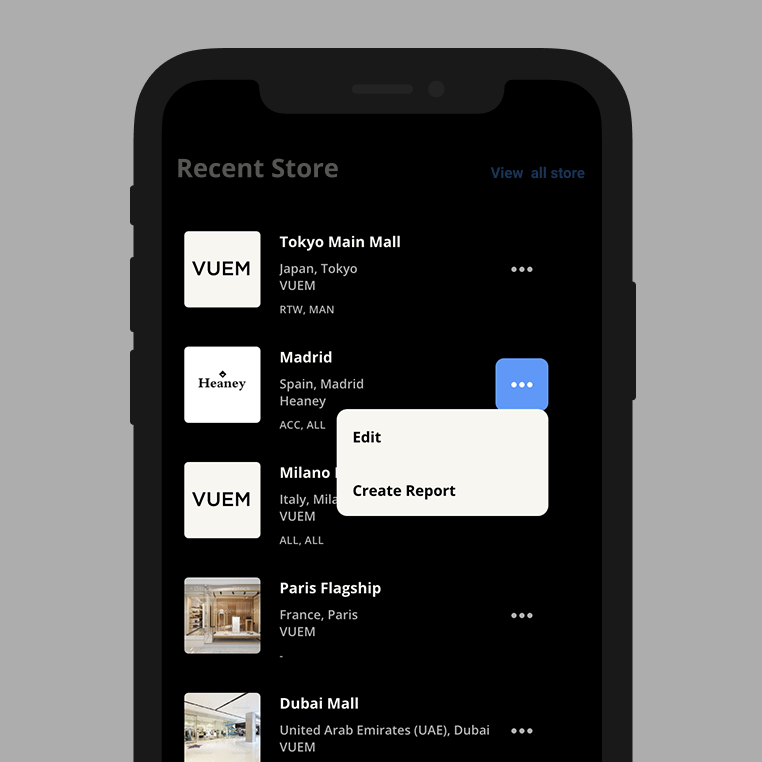
By clicking on the more actions button with the three dots it will be possible directly from the shop card to create a new report of the selected shop or edit its information.